Of course, cam2pc - An Image Downloader can do more than that. For instance, I like to store the images I shot in Paris on the 21st of February 2001 in a folder called [2001-02-21] Paris. Do I have to enter this information in the To field of the main window manually each time I transfer images? Of course not. So let's take a look at the advanced options...
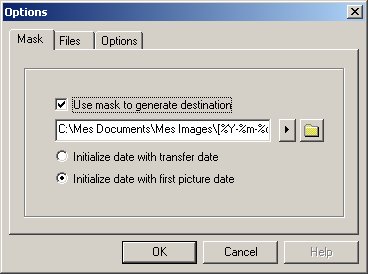
By clicking the Options... button in the main window, you open this window:
The first option, Mask, exactly deals with what we were talking about. The idea is to used switches like %d in the mask and have cam2pc - An Image Downloader replace these switches by the corresponding value, the number of the day in the case of %d.
So check the Use mask to generate destination option, go to the end of the edit field just below and click on the button with an arrow in it. A popup menu should appear listing all the switches available to you. You can type those switches directly in the mask or select them in the menu to insert them at the current location.
|
Switch...
|
Is replaced by (example is 21st of February, 2001 in Paris) |
|
%P
|
the P stands for prompt meaning that each time cam2pc - An Image Downloader needs to create a new destination directory name, a window will appear allowing you to enter any text (like Paris in my example). |
|
%d
|
the number of the day, 21 in my example |
|
%m
|
the number of the month, 02 in my example |
|
%a
|
the abbreviated name of the month, Feb in my example (see * below) |
|
%M
|
the full name of the month, February in my example (see * below) |
|
%y
|
the year without the century, 01 in my example |
|
%Y
|
the year with the century, 2001 in my example. |
The date used to calculate the date related switches can be determined on the date of the transfer or the date of the first image depending on the choice you make at the bottom of this window.
So to produce my [2001-02-21] Paris, my mask would simply be [%Y-%m-%d] %P. The window where you can enter text for your %P switch looks like this :
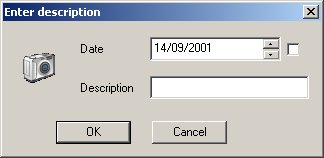
The text for the %P is to be entered. Above you can see the date that will be used to replace all the date related switches. By default it is the date of the day but you can specify any date. The checkbox on the right lets you switch between a scrolling calendar (as shown in this screenshot) or a real calendar. I let you experiment with that.
Note that if you want to be able to change the date used to generate a name but do not need any %P special character, just put a %P in your mask and always leave its value to a blank string. The window will still popup allowing you yo change the date and the %P will be replaced by nothing and disappear.
Enough for the mask!! Let's browse the other options.

The Files tab allow you define file renaming if you want it. cam2pc - An Image Downloader can rename on the fly the images you transfer. It works the same way as the mask works : it uses switches. All the switches described in the mask section work here. The %P is global for all the images : you will be prompted only one description for all images but this %P is different from the one used for the directory creation.
Some switches specific to file renaming are also available :
|
Switch...
|
Is replaced by (example is file name DSCF1000.JPG) |
|
%f
|
the filename without the extension, DSCF1000 in my example |
|
%F
|
the filename with the extension, DSCF1000.JPG in my example |
|
%e
|
the extension of the filename without the dot, JPG in my example |
|
%n[x]
|
a number incremented on each file, the x is the length of the padding. If you use a 3 character padding then 1 will show up as 0001. You can specify %n[a] : in that case the length of the padding will be calculated automatically depending on the number of files being transfered : if you transfer 99 files the padding will be 2, if you transfer 9999 files the padding will be 4. |
And now the last tab!

The Directory to look for is a name of a directory that cam2pc - An Image Downloader will try to find on any new media you insert. This will help it make the difference between your memory card and any other removable device. By defaul the value is DCIM which should fit all digial cameras. If your camera stores the images in a folder called IMAGES then simply put this value in here and you should be going.
The Answer YES to all prompts makes the file transfer happen without prompting for file replacement ot whatever. Use this option if you are sure to have no duplicates in filenames for your pictures. If you have a duplicate and this option is On then you will lose your old picture.
The Auto-download option is very useful once you have setup cam2pc - An Image Donwloader as you wish. If this is on and the software detects a new memory card, then it will directly transfer the pictures with all the settings you have set. Of course if you used a %P in your mask, you will still be prompted for a text. This feature can be disabled by holding the SHIFT key while connecting your camera. In that case even if the Auto-download feature is enabled the main window will popup.
Lastly, the Format media after succesful move option. This option still needs some work but basically the idea is that if cam2pc - An Image Downloader moved all the pictures from the memory card, this one can be formatted reclaiming the maximum of space available on the memory card. If this is enabled, a standard Drive formatting dialog box will appear. You will have to click the Format button to launch the formating. Use this option at your own risk: the formatting that Windows will do should be compatible with your digital camera and even if it is not you should be able to reformat the card in your digital camera buy you never know!!! This worked for the two cameras I own : Fuji FinePix 2400Zoom and Olympus C-200Z. I really can't tell for other cameras so don't bother asking me.
Okay good work. What is the image browser and the lossless jpeg rotations you were talking about?